Unlock A Flawless Feed: How To Make All Instagram Photos Same Size
Ever wondered how some Instagram feeds look so incredibly cohesive, almost like a digital art gallery? It's not magic; it's often a deliberate strategy centered around consistency, especially when it comes to visual elements. Learning how to make all Instagram photos same size is a foundational step in achieving that polished, professional aesthetic that captures attention and builds a strong brand or personal presence.
This guide will walk you through the essential techniques, tools, and best practices to ensure your Instagram feed is a harmonious visual narrative. We'll delve into the 'why' behind consistency and provide actionable steps to transform your photo presentation, ensuring every post seamlessly fits into your overall visual story. Just as a well-structured project requires a consistent build process to "make sense" of various components, your Instagram feed benefits immensely from a systematic approach to image sizing.
Table of Contents
- The Power of Visual Consistency: Why Size Matters
- Understanding Instagram's Dimensions: The Basics
- Pre-Capture Planning: Setting the Foundation
- Choosing the Right Tools: Your Digital Workshop
- The Workflow: A Systematic Approach to Sizing
- Advanced Techniques for Aesthetic Cohesion
- Troubleshooting Common Sizing Issues
- Making Your Feed "Make Sense": Beyond Just Size
- Conclusion: Your Consistent Instagram Journey
The Power of Visual Consistency: Why Size Matters
In the vast ocean of Instagram content, standing out requires more than just great photos; it demands a cohesive visual identity. Think of your Instagram profile as a digital portfolio or a curated art gallery. When visitors land on your page, their first impression is formed by the overall look of your grid. If your photos are haphazardly sized – some tiny squares, others stretched portraits, then squashed landscapes – it creates a jarring, unprofessional, and often unappealing experience. This lack of uniformity can subtly communicate a lack of attention to detail, which can deter potential followers or clients.
Conversely, a feed where all photos maintain a consistent size and aspect ratio immediately conveys professionalism, intentionality, and an eye for aesthetics. It’s like a well-organized library versus a pile of scattered books; one invites exploration, the other creates chaos. Consistent sizing simplifies the viewing experience, allowing your audience to focus on your content rather than being distracted by formatting inconsistencies. For brands and businesses, this visual harmony translates directly into brand recognition and trust. For individuals, it elevates your personal brand, making your content more shareable and memorable. Ultimately, knowing how to make all Instagram photos same size is a strategic move that enhances engagement, builds a stronger community, and solidifies your online presence.
Understanding Instagram's Dimensions: The Basics
Before you can standardize your photos, you need to understand the canvas you're working with. Instagram supports various aspect ratios, but it's crucial to pick one or a select few and stick to them for a cohesive look. Over the years, Instagram has evolved from its square-only origins to accommodate a wider range of photo dimensions. However, the platform still crops and resizes images to fit its display, which is why understanding optimal dimensions is key to maintaining quality and consistency.
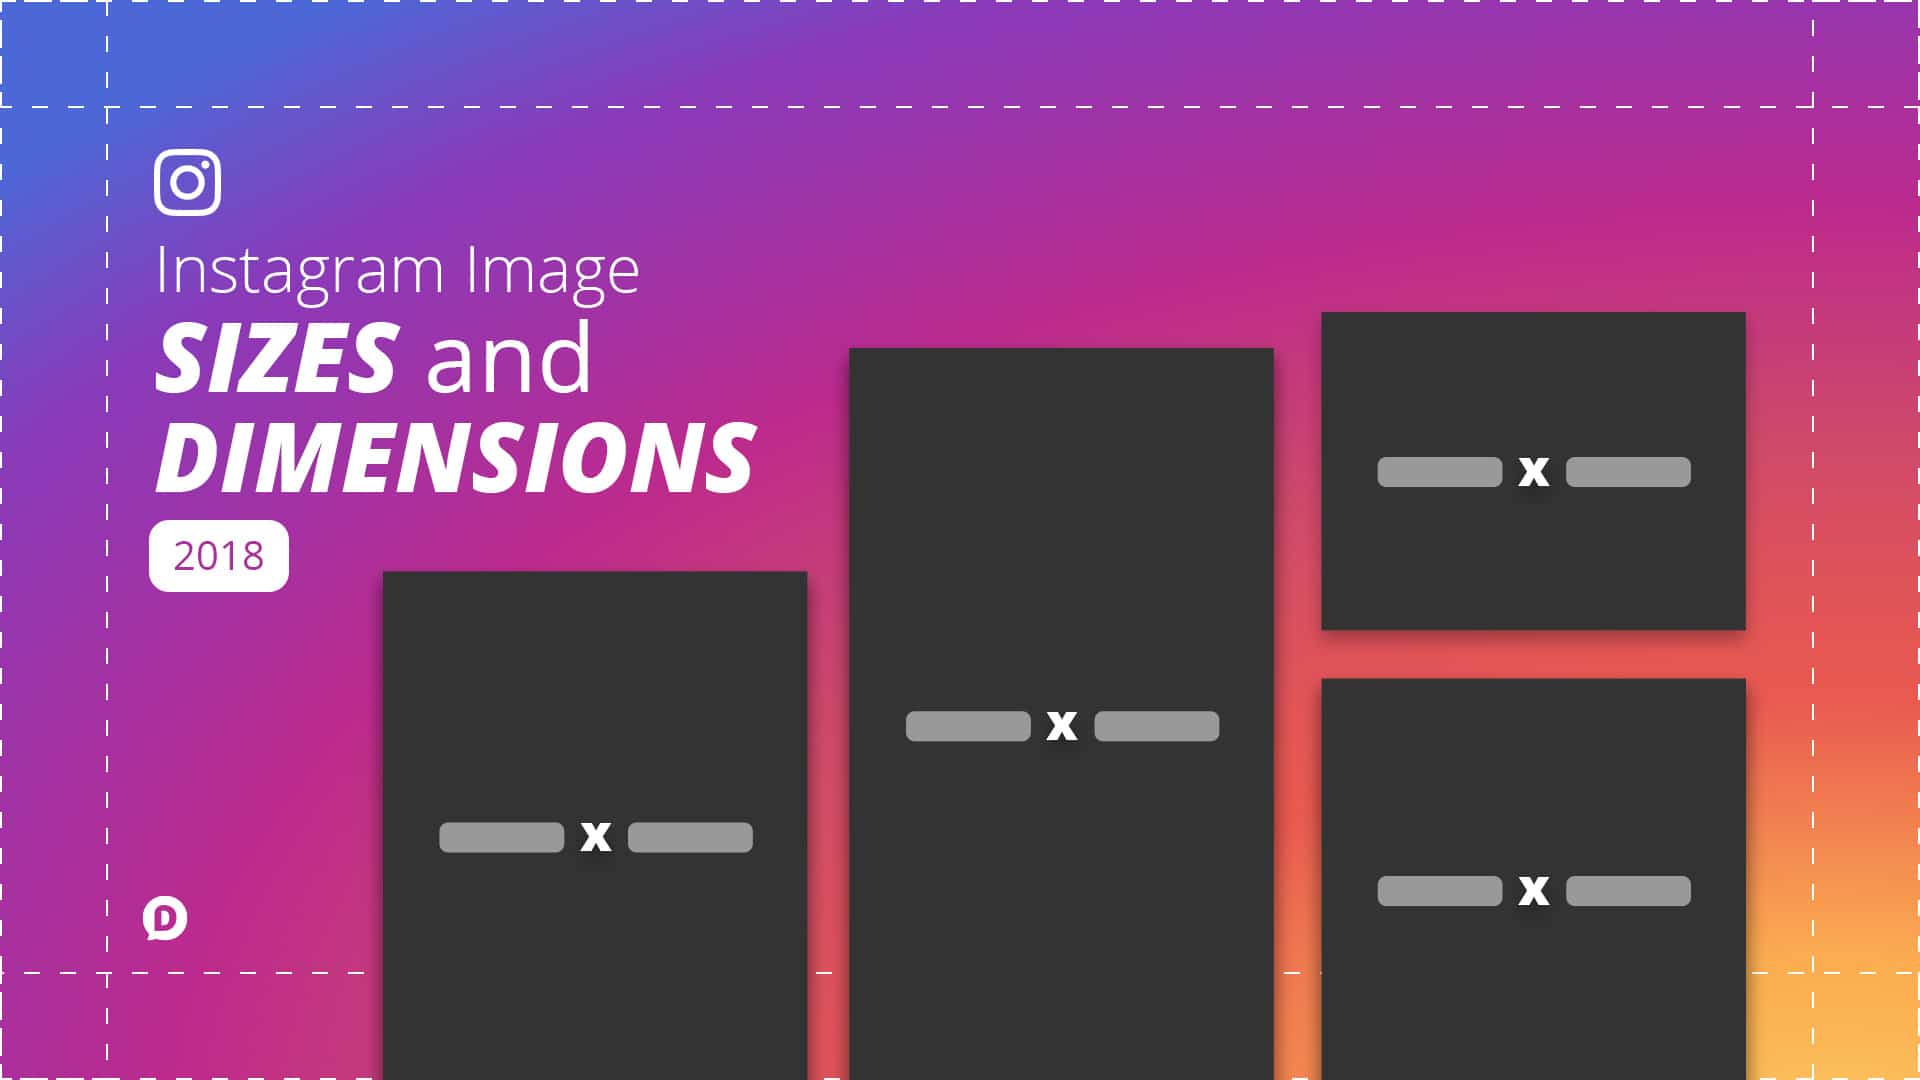
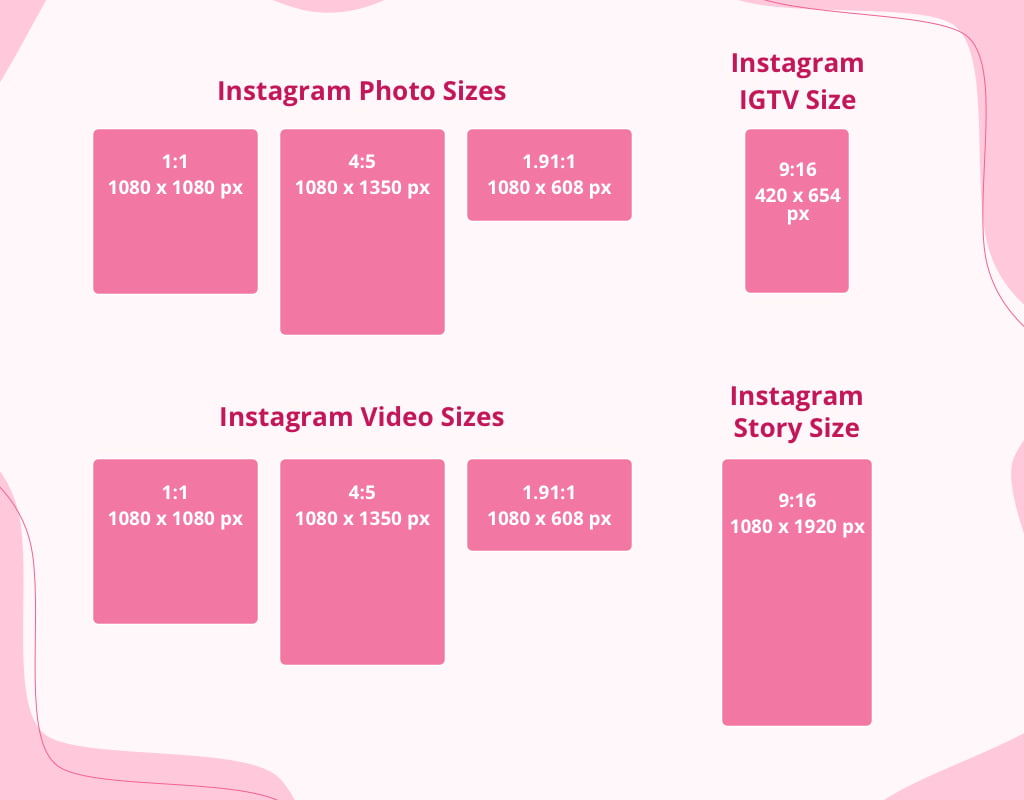
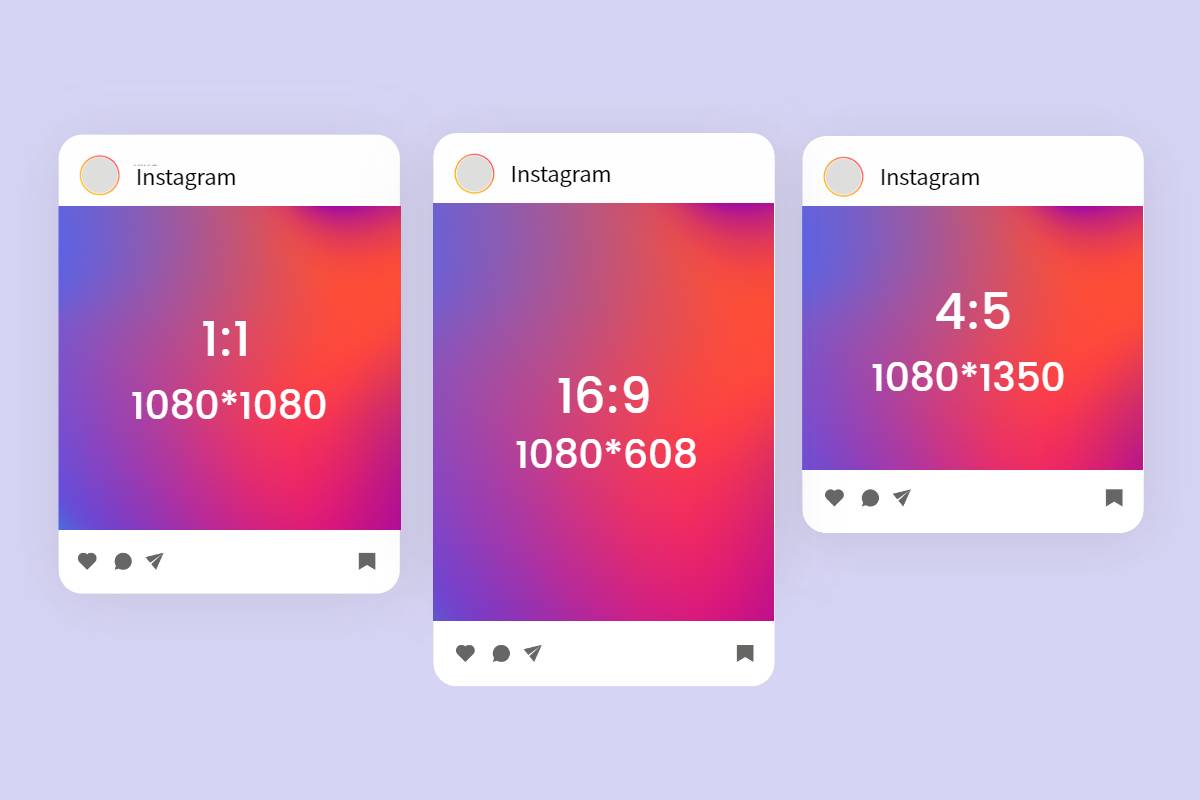
The maximum width Instagram displays images at is 1080 pixels. If you upload an image wider than this, Instagram will compress it, potentially reducing quality. For height, it varies by aspect ratio. Here are the most common and recommended aspect ratios and their corresponding optimal pixel dimensions:
Square (1:1)
The classic Instagram format. This is the safest bet for consistency, as it will always display perfectly in the grid without awkward cropping.
- Optimal Dimensions: 1080px by 1080px
- Aspect Ratio: 1:1
- Why it works: Guarantees no unexpected cropping in the grid or when viewed individually. It’s universally compatible and easy to manage.
Portrait (4:5)
Often referred to as "vertical" photos, this aspect ratio allows your images to take up more screen real estate, which can be great for capturing attention as users scroll through their feed.
- Optimal Dimensions: 1080px by 1350px
- Aspect Ratio: 4:5
- Why it works: Maximizes vertical space in the feed, making your content more prominent. However, be mindful that the grid view will still show a square crop of this image, so ensure your main subject is centered.
Landscape (1.91:1)
Horizontal photos are useful for wide shots, panoramas, or when you want to capture a broader scene.
- Optimal Dimensions: 1080px by 566px
- Aspect Ratio: 1.91:1 (or approximately 16:9, though Instagram's limit is slightly narrower)
- Why it works: Ideal for showcasing expansive views. These photos take up less vertical space in the feed, so they might be scrolled past quicker. Like portrait photos, the grid view will show a square crop, so composition is key.
While Instagram technically supports photos as wide as 16:9, the 1.91:1 ratio is generally the widest recommended to avoid excessive letterboxing or awkward cropping. For a truly consistent feed, many professionals choose one primary aspect ratio (e.g., always 1:1 or always 4:5) and stick to it religiously. This commitment to a single ratio is perhaps the most straightforward way to make all Instagram photos same size in appearance.
Pre-Capture Planning: Setting the Foundation
Achieving a consistent Instagram feed starts long before you even open an editing app. It begins with pre-capture planning. Think of this as defining your project's specifications, much like a software developer outlines requirements before writing code. Just as a "CMakeList.txt" defines how a project should be built, your pre-capture plan defines how your photos should be taken to ensure a unified output.
Here’s how to set the foundation:
- Choose Your Primary Aspect Ratio: Decide upfront if you're going for an all-square feed, an all-portrait feed, or a mix with a clear pattern. This decision will dictate how you frame your shots. For example, if you aim for 4:5 portraits, compose your shots with more vertical space.
- Frame for Consistency: When taking photos, mentally (or physically, using your camera's grid lines) frame your subject within your chosen aspect ratio. If you know you'll crop to a square, ensure the essential elements of your shot fit comfortably within a square. This proactive approach minimizes the need for drastic cropping later, which can compromise image quality or composition.
- Consider the Grid View: Remember that Instagram's main profile page displays a grid of square thumbnails. Even if you post portrait or landscape photos, a square portion of your image will be visible in the grid. Plan your composition so that the most important part of your photo is centered and looks good as a square. This foresight prevents the frustrating "preLaunchTask terminated, exit code 1" feeling when your carefully composed photo looks awkward on your profile.
- Lighting and Style: While not directly about size, consistent lighting and editing style contribute significantly to overall feed cohesion. If all your photos are consistently lit and edited, even slight variations in size will be less noticeable. Develop a consistent aesthetic – be it bright and airy, dark and moody, or vibrant and colorful.
- Use a Grid Planning App: Tools like Planoly, Later, or Preview allow you to visualize your feed before posting. You can upload your edited photos and arrange them to see how they look together. This is invaluable for ensuring visual flow and catching any sizing or aesthetic inconsistencies before they go live. It’s like a final "under review" stage before your content gets the "awaiting EIC decision" (or user approval).
By investing time in pre-capture planning, you streamline your editing process and ensure that every photo you take is already geared towards achieving that desired consistent look, making it much easier to make all Instagram photos same size.
Choosing the Right Tools: Your Digital Workshop
Once you have your photos, the next crucial step is using the right tools to resize and edit them. Just as a craftsman needs the right set of tools for a precise job, you'll need reliable software to make all Instagram photos same size without compromising quality. The good news is there's a wide array of options, from powerful desktop applications to convenient mobile apps.
Mobile Editing Apps
For those who primarily shoot and edit on their smartphones, these apps offer excellent functionality for resizing and cropping:
- Lightroom Mobile: A robust app from Adobe that offers professional-grade editing tools, including precise cropping and aspect ratio controls. You can save custom crop presets (e.g., 4:5 or 1:1) to quickly apply them to all your photos.
- Snapseed: A free and powerful photo editor by Google. It has an intuitive "Crop" tool with predefined aspect ratios and a "Perspective" tool that can help straighten images.
- VSCO: Known for its beautiful filters, VSCO also includes a good set of editing tools, including cropping. It allows you to apply consistent edits and sizes across your photos.
- InShot / CapCut: While primarily video editors, these apps also offer excellent photo editing capabilities, including precise canvas sizing. You can choose a canvas (e.g., 1:1, 4:5) and then fit your photo into it, adding borders if necessary.
- Photo & Picture Resizer: A simple, single-purpose app designed specifically for resizing photos quickly. Great for batch processing if you just need to adjust dimensions.
Desktop Software
For photographers and content creators who prefer working on a larger screen with more precision, desktop software is the way to go:
- Adobe Photoshop: The industry standard. Photoshop offers unparalleled control over image size, aspect ratio, and quality. You can create actions to automate resizing and exporting for Instagram.
- Adobe Lightroom Classic: Excellent for managing large photo libraries and applying consistent edits. Its export settings allow you to define exact dimensions and quality for Instagram uploads.
- GIMP (GNU Image Manipulation Program): A free and open-source alternative to Photoshop. It has powerful resizing and cropping tools, though it might have a steeper learning curve.
- Affinity Photo: A popular, one-time purchase alternative to Photoshop, offering professional features for a fraction of the cost. It provides robust resizing and export options.
- Preview (Mac) / Photos (Windows): Basic built-in photo editors that can perform simple cropping and resizing. While not as feature-rich as dedicated software, they are quick for basic adjustments.
When using any of these tools, always aim to export your final images at 1080 pixels on their longest side (either width or height, depending on the aspect ratio) to maintain optimal quality for Instagram. Remember, the goal is to make all Instagram photos same size in appearance, and consistent use of a chosen tool is key to achieving this.
The Workflow: A Systematic Approach to Sizing
To truly make all Instagram photos same size and maintain that consistency, you need a systematic workflow. Think of this as your personal "build process" for content, much like how CMake and Make streamline software compilation. Just as CMake generates a Makefile for different platforms, your workflow should generate consistently sized photos regardless of their original dimensions or the device you used to capture them. This structured approach helps avoid common pitfalls and ensures a smooth, repeatable process.
Here’s a recommended workflow to achieve uniform Instagram photo sizes:
- Establish Your "Blueprint" (Aspect Ratio & Dimensions):
- Before you even start editing, firmly decide on your primary aspect ratio (e.g., always 1:1, always 4:5, or a specific pattern).
- Note down the exact pixel dimensions you'll aim for (e.g., 1080x1080px for square, 1080x1350px for portrait). This is your target specification.
- Import and Initial Culling:
- Import your photos into your chosen editing software (Lightroom, Photoshop, Snapseed, etc.).
- Review and select only the best images. Discard any that don't meet your quality standards or won't fit your aesthetic.
- Apply Global Edits (Color, Exposure, Tone):
- Before resizing, apply your consistent color grading, exposure adjustments, and tonal corrections. This ensures the visual style is uniform across all images.
- If you have presets, apply them here.
- Crop to Your Chosen Aspect Ratio:
- This is the critical step for sizing. Use the crop tool in your software to precisely crop each photo to your predetermined aspect ratio (e.g., 1:1, 4:5).
- Pay close attention to composition during this step. Ensure your main subject remains prominent and the image still "makes sense" visually after cropping.
- Resize to Optimal Pixel Dimensions:
- After cropping, resize the image to the exact pixel dimensions (e.g., 1080px on the longest side). Most editing software has an "Image Size" or "Export" dialogue where you can specify dimensions.
- Ensure "resample image" is checked and use a high-quality resampling method (e.g., Bicubic Sharper for reduction).
- Sharpening and Export:
- Apply a subtle amount of output sharpening, if necessary, as resizing can sometimes soften images.
- Export your images as JPEGs. For Instagram, a quality setting of 75-85% (out of 100%) is usually sufficient to balance file size and quality. Instagram will compress them further, so avoid excessively large files.
- Final Review (Grid Planning):
- Use a grid planning app (like Planoly or Later) to preview how your newly sized and edited photos look together on your Instagram grid.
- This step is like the final "under review" stage, allowing you to catch any last-minute inconsistencies before they are published. If something doesn't look right, you can "resubmit" (re-edit) it.
By following this systematic workflow, you create a repeatable process that ensures every photo you upload adheres to your chosen sizing and aesthetic standards. This consistency is what truly makes your Instagram feed stand out and "make sense" to your audience.
Advanced Techniques for Aesthetic Cohesion
Beyond simply making all Instagram photos same size, there are advanced techniques that can elevate your feed's aesthetic cohesion to an even higher level. These methods go beyond basic cropping and resizing, delving into more nuanced visual strategies that create a truly professional and captivating presence.
- Borders and Frames: Adding a consistent border around your photos is a powerful way to unify diverse images. A thin white border, for instance, can visually separate images in the grid while providing a clean, uniform frame. Many editing apps (like InShot or even Instagram's built-in editor) allow you to add borders. This creates a consistent "canvas" size for every photo, regardless of its original aspect ratio, as the photo plus border fits into your chosen dimension.
- "No Crop" Solutions for Portrait/Landscape: If you absolutely must post a photo that doesn't fit your primary aspect ratio (e.g., a full 9:16 portrait in a 4:5 feed), consider using a "no crop" app. These apps add blank space (usually white or black) to the sides of your photo to make it fit a square or 4:5 frame. While this doesn't strictly make the *photo* the same size, it makes the *post* appear as a consistent dimension in the feed, maintaining grid harmony. However, use this sparingly, as it can sometimes make photos look smaller or less impactful.
- Batch Processing and Presets: For efficiency and consistency, leverage batch processing features in desktop software like Lightroom or Photoshop. Once you've perfected an edit and size for one photo, you can apply those same settings (including crop and export dimensions) to an entire batch of images. Creating custom export presets (e.g., "Instagram 1080x1350") ensures that every photo exported through that preset will have the exact same dimensions and quality settings. This is akin to writing a robust `Makefile` that handles all your compilation needs automatically.
- Content Pillars and Color Palettes: Develop a consistent content strategy that includes specific themes or "content pillars" and a defined color palette. For example, if your feed is about nature, stick to earthy tones. If it's fashion, perhaps vibrant pastels. This visual consistency, combined with uniform sizing, creates a powerful brand identity. Tools like Adobe Color can help you build and maintain a consistent palette.
- Strategic Use of Carousels: While single images benefit from consistent sizing, carousels offer an opportunity to tell a story with multiple images. You can use carousels to break from your primary aspect ratio for specific shots, knowing that the main grid image will still conform to your standard. For example, your first image in a carousel could be a 4:5 portrait, while subsequent images within the same carousel could be a mix of landscapes or squares. This offers flexibility without sacrificing overall grid consistency.
By implementing these advanced techniques, you move beyond mere technical sizing to create a truly curated and aesthetically pleasing Instagram feed that captivates your audience and reinforces your brand identity.
Troubleshooting Common Sizing Issues
Even with a well-defined workflow, you might occasionally encounter issues when trying to make all Instagram photos same size. These "bugs" in your visual workflow can be frustrating, much like encountering a "preLaunchTask terminated, exit code 1" error in a software build. Understanding common problems and their solutions is key to maintaining a smooth and consistent Instagram presence.
Here are some frequent sizing issues and how to troubleshoot them:
- Blurry or Pixelated Photos:
- Cause: Uploading images with too low a resolution, or Instagram's compression being overly aggressive.
- Solution: Always export your photos at 1080 pixels on their longest side. Avoid upscaling small images, as this introduces pixelation. Ensure your original photos are high quality. If using a mobile app, check its export quality settings.
- Unexpected Cropping in the Grid:
- Cause: Your photo's main subject isn't centered, or it doesn't look good when Instagram automatically crops it to a square for the grid view.
- Solution: During your cropping step, always consider the square grid preview. Compose your shots so that the most important elements are within the central square area. Use a grid planning app to preview how it will look before posting.
- Black Bars (Letterboxing/Pillarboxing):
- Cause: Uploading a photo with an aspect ratio significantly different from Instagram's supported ones (e.g., a very wide panorama or a very tall vertical). Instagram adds black bars to fill the frame.
- Solution: Stick to Instagram's recommended aspect ratios (1:1, 4:5, 1.91:1). If you must use an extreme ratio, consider using a "no crop" app that adds white or colored borders to make it fit a standard frame, or use it within a carousel where it might be less jarring.
- Inconsistent Look Between Posts:
- Cause: Variations in your editing style, or not strictly adhering to your chosen aspect ratio.
- Solution: Review your workflow. Are you consistently applying the same crop and resize settings? Are your color grading and stylistic edits uniform? Create and use presets for both editing and export settings. This is where your "build process" needs to be robust, ensuring that the output is always consistent, much like a successful `make` command.
- "My Photo Looks Different After Uploading!":
- Cause: Instagram's internal compression algorithm.
- Solution: While you can't entirely stop Instagram's compression, you can minimize its impact. Export your photos at 1080px on the longest side. Keep file sizes reasonable (e.g., under 1MB for JPEGs). Avoid uploading images with excessive noise or very fine details, as these are often affected more by compression. Some users report better quality when uploading via Wi-Fi vs. mobile data, or ensuring "High-Quality Uploads" is enabled in Instagram settings (Settings > Account > Data Usage).
By systematically addressing these common issues, you can troubleshoot your way to a perfectly consistent feed. It’s about understanding the system and making adjustments, just as you would debug a piece of code to "make sense" of an error and resolve it.
Making Your Feed "Make Sense": Beyond Just Size
The phrase "make sense" is often used in conversation to denote clarity, logic, and coherence. When applied to your Instagram feed, it perfectly encapsulates the goal of visual consistency: to make your entire profile "make sense" to anyone who lands on it. While learning how to make all Instagram photos same size is a critical technical step, true feed cohesion extends beyond mere dimensions. It’s about creating a narrative, a brand identity, or a personal style that resonates with your audience and communicates your message effectively.
Here's how to make your Instagram feed truly "make sense" as a whole:
- Develop a Signature Style: This encompasses your color palette, lighting preferences, and overall mood. Do you prefer bright and airy, dark and moody, vibrant and bold, or muted and minimalist? Sticking to a consistent style across all your photos, regardless of content, creates instant recognition. This is your visual "voice."
- Curate Your Content Themes: What stories do you want to tell? What topics do you want to cover? Having 2-3 core content themes (e.g., travel, food, lifestyle; or product shots, behind-the-scenes, customer features) helps you stay focused and ensures your content is relevant to your audience. This helps your feed "make sense" thematically.
- Plan Your Grid Layout: Beyond individual photo sizes, consider how your photos interact on the grid. Do you want a checkerboard pattern, a row-by-row theme, or a puzzle feed? Grid planning apps are indispensable here. A well-planned grid creates visual flow and makes your profile more engaging.
- Engage with Your Audience: Consistency isn't just visual; it's also about consistent engagement. Respond to comments, interact with DMs, and participate in relevant conversations. This builds community and makes your presence feel more authentic and "real."
- Be Patient and Persistent: Building a cohesive and impactful Instagram feed takes time and consistent effort. You might need to "resubmit" (re-edit) photos, try different layouts, and constantly refine your approach. Just as an academic paper goes through "under review" and
Instagram Sizes & Dimensions 2019: Everything You Need to Know
The Only Instagram Image Size Guide You Need in 2021 | Tailwind App
Instagram Post Size: Ultimate Guide for All Types of Instagram Posts
